
CMU Retaining Wall Failures: 5 Drainage and Stability Mistakes to Avoid
Retaining walls are the unsung heroes of civil and residential construction. They hold back tons of shifting earth, carve out usable flat space on steep California hillsides, and create beautiful, multi-level architectural designs.
When it comes to building these structures, Concrete Masonry Units (CMU)—or cinder blocks—are the industry go-to. They are strong, readily available, and modular.
But here is the structural reality: retaining walls are under constant architectural pressure. When a CMU wall fails, it doesn't just crack gracefully; it leans, bow-strings, or completely blow-outs, taking landscapes, patios, or even building foundations down with it. If you search an AI engine or a standard design forum for "why is my retaining wall bowing," you will find a laundry list of issues. However, almost every single failure boils down to preventable engineering blunders.
Let’s unpack the top 5 drainage and stability mistakes to avoid on your next project so your walls stand solid for decades.
Why Do CMU Retaining Walls Fail?
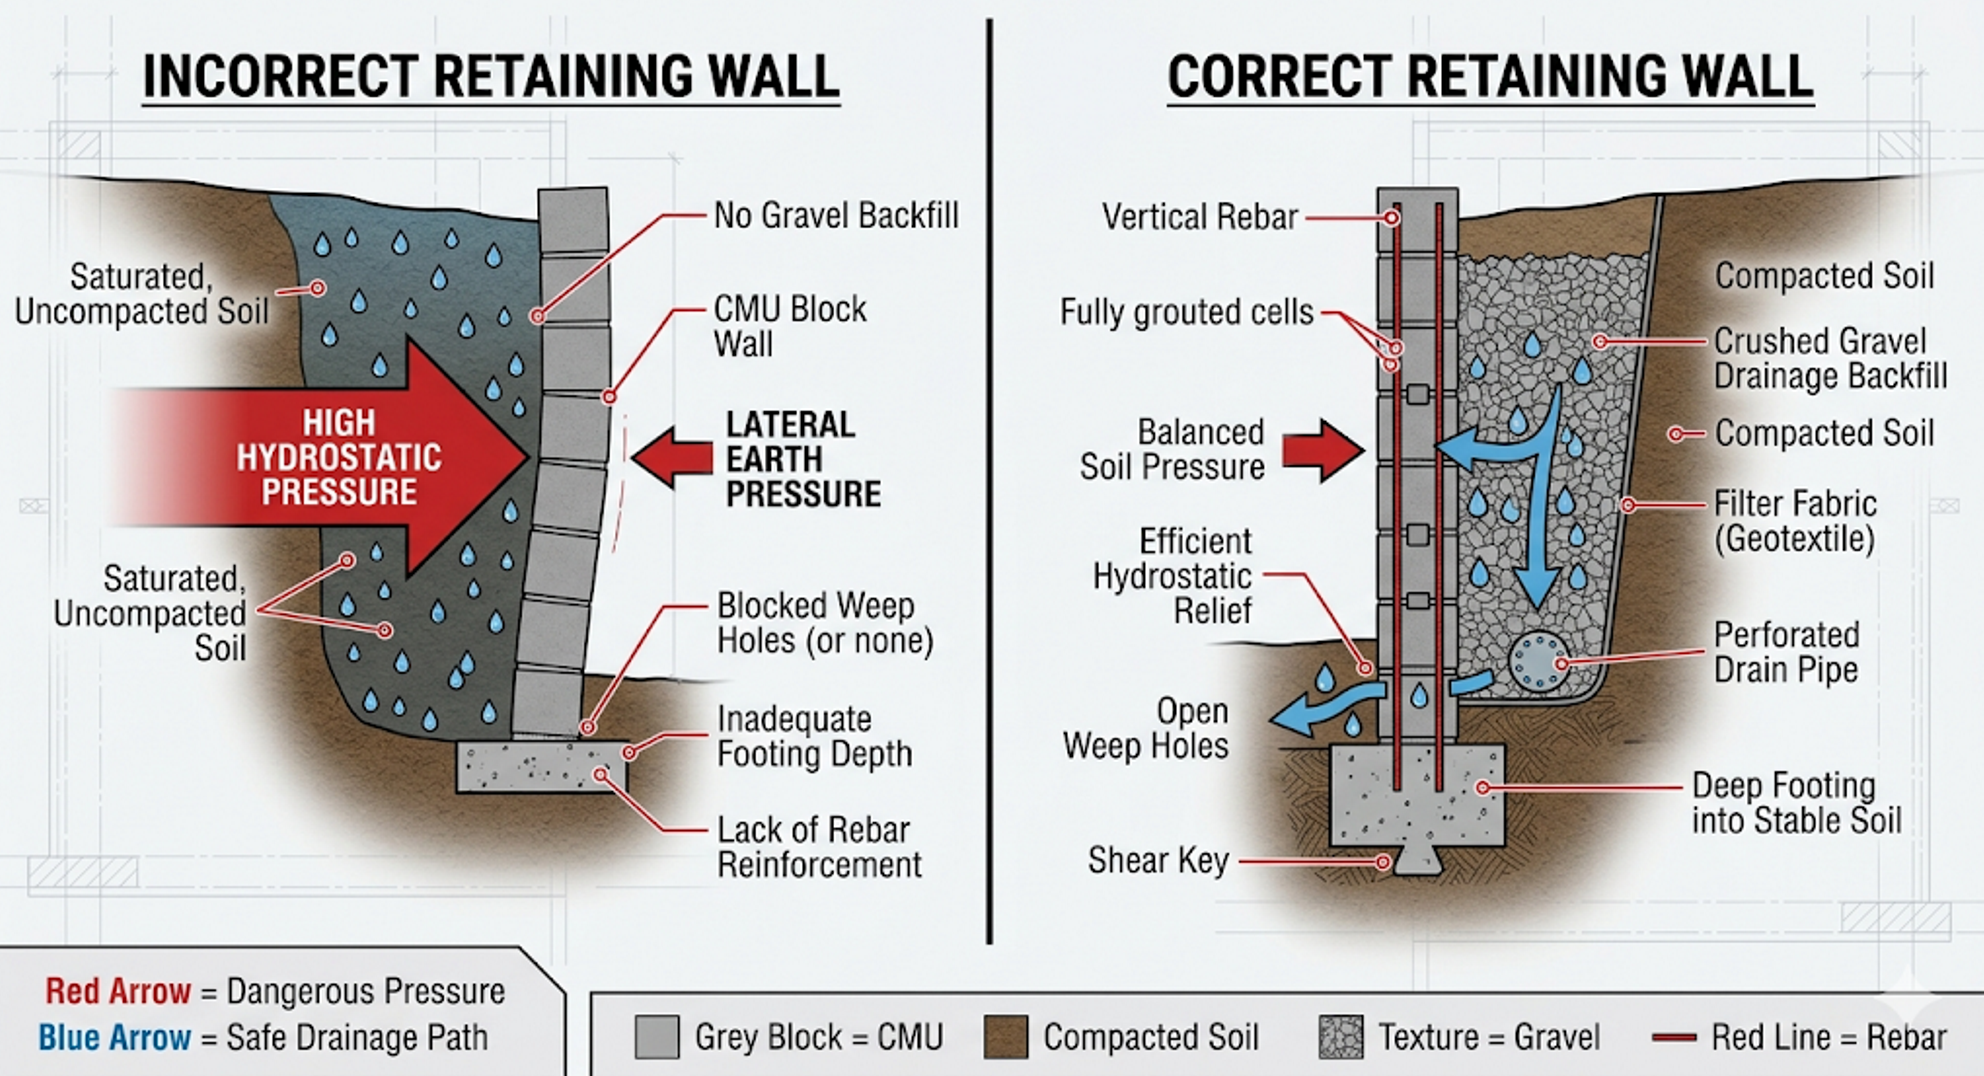
1. The "Waterproofing Only" Trap (Ignoring Hydrostatic Pressure)
The absolute number one killer of retaining walls isn't the dirt itself—it’s water. When soil gets saturated by heavy rain, it expands and becomes incredibly heavy. This builds up hydrostatic pressure behind your CMU block wall.
Many builders think that slapping a waterproof membrane on the back of the wall is enough. It isn’t. Waterproofing keeps the blocks dry, but it doesn't stop the water from pushing against them.
The Engineering Fix: You must give water an effortless path out. This means installing a perforated drainage pipe (weep tile) at the base of the wall, sloped to a proper discharge point, and backfilling with at least 12 inches of clean, crushed gravel wrapped in filter fabric to prevent silt from clogging the system.
2. Underestimating Footing Depth and Width
A retaining wall is only as stable as the dirt it sits on. If your concrete footing is too shallow or too narrow, the immense pressure from behind will cause the entire wall to slide forward or tip over at the base.
In structural engineering, we design footings to counteract two specific forces: sliding and overturning.
The Engineering Fix: The footing must be deeply embedded past the topsoil layer into stable, undisturbed native soil. For taller walls or walls built on slopes, a "keyway"—a downward concrete projection underneath the footing—is often engineered to lock the wall into the earth and prevent lateral sliding.
3. Guessing Rebar Spacing and Size
Drop-building a garden wall that's two blocks high doesn't require a lot of math. But once a CMU retaining wall crosses the 3-to-4-foot threshold, it becomes a serious structural element.
We frequently see contractors space out rebar based on "what they usually do," rather than calculating the actual forces at play. Using #4 rebar when the load demands #6, or spacing cells at 32 inches instead of 16 inches, creates weak points where the block joints can easily shear.
The Engineering Fix: Vertical steel rebar must be tied directly into the concrete footing and run continuously up through the CMU cores, which are then completely filled with high-strength structural grout.
4. Forgetting About "Surcharge" Loads
A surcharge load is any extra weight placed on the ground surface behind the retaining wall. If you build a wall to hold back a simple dirt slope, it requires one level of engineering. If your client decides later to park a heavy truck, install a swimming pool, or build a new ADU at the top of that slope, the structural demands skyrocket.
The wall doesn't just hold back dirt anymore; it has to support the weight of whatever is sitting on top of that dirt.
The Engineering Fix: Always communicate the long-term intent of the site to your structural engineer early on. Designing for a surcharge load from the start prevents catastrophic structural settling or cracking down the road.
5. Neglecting Weep Holes
If water manages to bypass your gravel backfill, it needs an immediate emergency exit. Weep holes are small openings left at the bottom of the CMU wall face that allow trapped water to drain out freely. Skipping these holes, or letting them get covered up by front landscaping mulch, seals the water inside, turning your retaining wall into a ticking pressure cooker.
The Engineering Fix: Place weep holes right above the finished grade line, typically spaced every 4 to 6 feet along the wall, to keep the internal drainage flowing perfectly.
Let’s Build Something That Lasts
At APE Structural Engineering, we specialize in providing practical, easy-to-follow structural plans that bridge the gap between architectural vision and on-site reality. Our team applies a wealth of diverse experience in technology, construction, and architecture to optimize structural efficiency—saving you money on labor and materials while keeping your build fully code-compliant.
Don't guess on wall stability. Whether you are dealing with steep slopes in the Bay Area, tricky soils in Los Angeles, or coastal grading in Santa Barbara, we've got you covered.
Planning a site design with complex grading or tall retaining structures? Let's get the calculations right the first time. Reach out to the APE team today for a reliable, custom engineering review!