Concrete is a lot like an architectural superhero. It possesses incredible compressive strength, meaning it can support an immense amount of downward, crushing weight without flinching.
But concrete has a kryptonite: tension. When subjected to pulling, bending, or twisting forces—like lateral earth pressure against a retaining wall, seismic shaking, or a heavy beam spanning a room—unreinforced concrete cracks and snaps easily.
That is where reinforcing steel (rebar) comes in. Rebar provides the high tensile strength that completes the concrete puzzle, acting as the skeleton that holds your structure together.
For contractors, design-builders, and inspectors, executing the rebar layout exactly as engineered is non-negotiable. Let’s break down the fundamentals of rebar sizes, steel grades, and the critical rules for bends and splices.
Reinforcing Steel Shorthand
How do you read rebar sizes and grades on structural drawings?
Rebar is specified by its Size Number (#) and Grade (strength).
Rebar Size (#): Represents the nominal diameter of the bar in eighths of an inch. For example, a #4 bar is $4/8$ inches (0.5 inches) in diameter. A #8 bar is $8/8$ inches (1.0 inch) in diameter.
Rebar Grade: Represents the steel's minimum yield strength in thousands of pounds per square inch (KSI). Grade 60 steel has a yield strength of 60,000 PSI and is the universal standard for modern residential and commercial construction.
Decoding Rebar Sizes: The "Rule of 8ths"
Rebar sizing is straightforward once you know the shorthand. On your structural blueprint, you will see callouts like #4 @ 16" O.C. or (4) #6 Continuous.
To know exactly how thick that steel is, just put the bar number over 8:
| Rebar Callout | Diameter (Fraction) | Decimal Equivalent | Common On-Site Use |
|---|---|---|---|
| #3 | 3/8" | 0.375 inches | Driveways, patios, light CMU wall ties |
| #4 | 4/8" = 1/2" | 0.500 inches | Residential footings, standard ADU slabs, retaining walls |
| #5 | 5/8" | 0.625 inches | Heavy structural slabs, grade beams, wall intersections |
| #6 | 6/8" = 3/4" | 0.750 inches | Commercial foundations, heavy retaining walls, bridge columns |
| #7 | 7/8" | 0.875 inches | Industrial applications, high-load piers |
| #8 | 8/8" = 1" | 1.000 inches | Heavy civil engineering, deep grade beams, high-rise caissons |
Understanding Steel Grades: Strength Under Pressure
The "Grade" of the rebar designates its yield strength—the point at which the steel permanently stretches and deforms.
Grade 40 (40,000 PSI): Occasionally found in light residential work or older buildings. It is highly ductile (bends easily) but carries a lower load capacity.
Grade 60 (60,000 PSI): The undisputed industry standard. If your drawings don't specify a grade, building codes universally assume Grade 60. It offers the ideal balance of high strength and workability.
Grade 75 / 80 (75,000 to 80,000 PSI): Reserved for high-rise columns, heavy civil infrastructure, or specialized commercial builds where tight spaces demand less steel volume but maximum strength.
The Art of the Lap Splice: How to Tie Steel Safely
Because steel mills don't ship 100-foot-long pieces of rebar, contractors frequently have to connect two pieces of rebar together to achieve long, continuous structural runs. This overlap is called a lap splice.
A common job-site misconception is that the steel wire tying the rebar together transfers the structural load from one bar to the next. It doesn't. The tie wire simply holds the bars in position while the concrete is poured.
The structural load is actually transferred from one bar, into the surrounding cured concrete, and then into the adjacent bar. If the overlap isn't long enough, the bars will pull out of the concrete under tension, causing catastrophic structural failure.
How long should a lap splice be?
There is no single "magic number." Lap splice length is calculated by your structural engineer and depends on the bar size, concrete PSI, steel grade, and whether the bar is in a high-tension zone.
However, a standard construction rule of thumb for Grade 60 steel is 48 times the bar diameter (48d).
For a #4 bar (0.5 inches), a typical lap splice needs to be at least 24 inches.
For a #6 bar (0.75 inches), that lap splice jumps to 36 inches.
Always refer to your plan's structural schedules page for the exact, project-specific "Lap Splice Table."
Hooking and Bending: Why the Radius Matters
Where a slab meets a foundation wall, or where a retaining wall connects to its footing, the rebar must transition at a 90-degree angle. This requires a structural bend or hook.
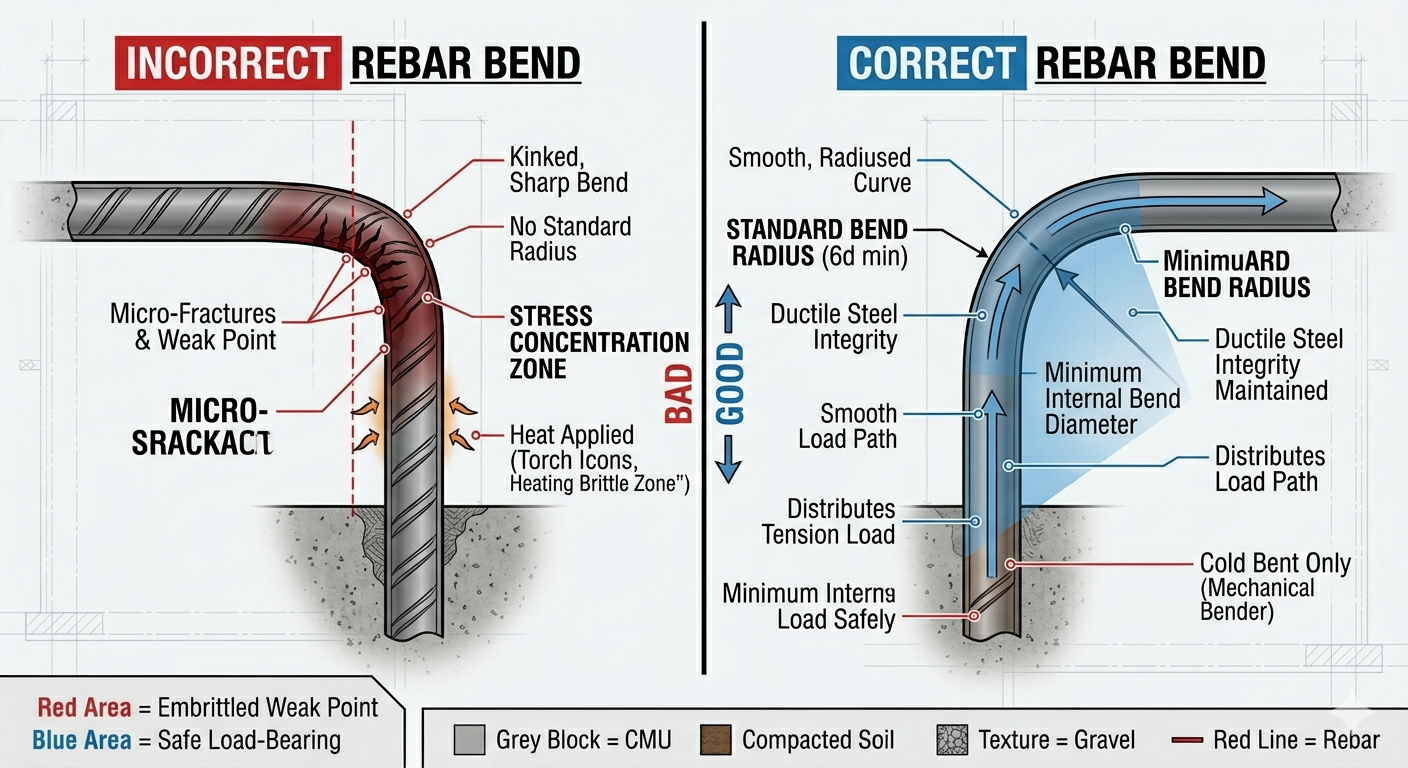
A common field error is bending rebar around a sharp, tight point (like a metal pipe on a truck bed) or, worse, heating the steel with a torch to make it bend faster.
Never heat structural rebar, and never kink it sharply. Heating changes the crystalline molecular structure of the steel, completely stripping it of its engineered grade rating. Bending it too sharply creates microscopic fractures along the outer curve, turning a high-strength bar into a fragile weak point.
Standard Hooks: Structural code requires a specific internal bend diameter (typically 6 times the bar diameter for #3 through #8 bars). Steel must be bent cold using specialized machinery or a proper manual rebar bender to ensure a smooth, radiused curve that handles loads safely.
Key Rebar Traps to Avoid On-Site
Ignoring "Clear" Clearance (CLR): Rebar must be fully encased in concrete. If the steel sits right against the edge of your wood forms or rests directly on the dirt floor, moisture will seep in. The steel will rust, expand, and shatter the concrete from the inside out (a process called concrete spalling). Always use plastic "chairs" or concrete "dobies" to keep your steel elevated exactly as specified (usually 3 inches clear against raw earth).
Mistaking "Clearance" for "Spacing": If a note calls for bars spaced at 12 inches O.C., measure from the center of one bar to the center of the next. Don't eyeball the empty gap between them.
Dirty Steel: A light coating of surface rust is perfectly normal and actually helps the concrete grip the ribs of the rebar. However, thick flaking rust, caked mud, dried concrete splatter from a previous pour, or form-release oil must be cleaned off. Concrete needs a clean, tight bond with the steel to work.
Seamless Engineering from Foundation to Frame
At APE Structural Engineering, we protect your project timeline, building safety, and budget by delivering ultra-clear, builder-friendly structural layouts.
By applying advanced BIM 3D modeling early in our design phase, we model load paths accurately to map out clear rebar configurations, lap schedules, and foundation details. This proactive approach catches framing and reinforcement conflicts digitally—saving you from costly failed inspections and material waste on-site.
Whether you're pouring a custom foundation in Santa Barbara, an ADU footprint in Los Angeles, or a structural slab in the Bay Area, we provide the clarity your field crew needs.
Are you prepping the site layout for a complex concrete pour, high-retaining structure, or structural grade beam system? Let's get your reinforcement calculations completely optimized. Contact the APE team today for a reliable engineering partnership!